Microorganisms are too small that they cannot be seen with an unaided eye. They can only be viewed with the
aid of a microscope. Many features of interest in biological systems are too small to be seen without the aid of a
microscope.
All laboratory users therefore must be familiar with the operations of the microscope.
A microscope is simply an instrument where lenses are arranged in such a way that an object is magnified several times before the final magnification in the observer’s eye lens. It is a precision instrument that should be handled with care. The use of the microscope involves some application of the principles of elementary optics.
The basic structure of the microscope is the lens. The aperture of a lens refers to its diameter. The aperture could
be reduced in order to confine the light to a more central position without changing the size of the image.
THEORETICAL PRINCIPLES OF THE MICROSCOPE
Basic principles that should be properly understood
in microscopy include Magnification, Numerical aperture
(NA) Resolution and Illumination.
MAGNIFICATION
This is the artificial increase in size and dimensions of object. Useful magnification therefore, is one that an object. Useful magnification therefore, is one that increases the details and sharpness of an object an this is controlled by the wavelength of the light rays used.
In contrast, empty magnification is a magnification without a resolution. Magnification of a specimen/ sample is obtained by multiplying the eyepiece magnification by the objective lens magnification.
This value is referred to as TOTAL
MAGNIFICATION. For example, eyepiece (x10) x objective (x40)
Total magnification = 10 x 40 =400x
The objective lens is nearer to the specimen and magnifies it, producing the real image that is projected up
into the focal plane and then magnified by the ocular lens to produce the final image.
ILLUMINATION
Effective illumination is required for efficient magnification
and resolution. The source of light could be electricity, daylight or mirror. Since the intensity of daylight is an
uncontrollable variable (useful only in subdued form), artificial light from a tungsten lamp is the most commonly
used light source in microscopy. It is easier to adjust and could be in-built or external. The light is passed through the
condenser located beneath the stage.
NOTE: Sometimes the object has to be very brightly lit, at other times, less light is needed. The light shining on the object can be altered in two ways:
- Made brighter by moving the condenser upwards until it almost touches the slide
- Made darker by closing the iris diaphragm.
The mirror: Rays from the light source are reflected by the mirror onto the object. Use the plane side of the mirror it
there is a condenser or the concave side if there is no condenser.
WORKING DISTANCE (Focal length of the objective)
There is only one distance at which the object is clearly seen or is in focus. This distance is called the working distance
and is defined as the distance between objective and object when inmage is in focus. That is, the greater the
magnification, the smaller the working distance.
Example.
- x10 objective requires a working distance of 5-6mm.
- x40 objective requires 0.5-1.5mm, while, x100 objective requires 0.15-0.20mm
So, watch out when focusing, especially with x100 lens to avoid damaging the slide or smear.
ROLE OF OIL IMMERSION IN MICROSCOPY
The use of immersion oil increase the resolving power of an objective (especially x10 objective) by conserving many light rays that would have been lost by refraction if a dry
objective were used.
RESOLVING POWER OR RESOLUTION
Resolution is the ability of an optical system to reveal closely adjacent objects as being separate or distinct. The resolving power of an objective lens is dependent on the wavelength of light used and the numerical aperture which is characteristic of each lens and engraved on the sleeve of the lens. Resolution determines how finely a lens is able to distinguish the details of a specimen.
NUMERICAL APERTURE (OBJECTIVES)
Numerical aperture (NA) is the resolving power of an objective. The greater the NA figure, the greater the resolving power of an objective. The greater the NA figure, the smaller the front lens, so that of x100 objective is like a pin head (handle with care).
TYPES OF MICROSCOPES
Several microscopes a are available to the user. However, they all make use of a coordinated system of lenses arranged
that a magnified image of a specimen is seen by the observer.
The three main types of microscopy are:
- The light microscopy
- Transmission electron microscopy
- The scanning electron microscopy
Their major differences include:
- Differences in wavelength of electron image.
- The nature and arrangement of the lens system
- The different types of methods used to view the image.
THE LIGHT MICROSCOPE
Many types are known and they include:
1. The binocular compound microscope (Brightfield microscope)
2. Dissecting microscope
3. Dark field microscope
4. Phase contrast microscope
5. Fluorescent microscope
6. Polarized light microscope etc.
Brightfield Microscope:
This instrument contains two lens
systems for magnifying specimens – the ocular lens in the eyepiece and the objective lens located in the nosepiece.
The specimen is illuminated bya beam of tungsten light focused on it by a sub-stage lens called a condenser. The result is that the specimen appears dark against a bright background. A
major limitation of this system is the absence of contrast between the specimen and the surrOunding medium which makes it difficult to observe living cells.
Therefore most brightfield observations are performed on non-viable,
stained preparations.
Darkfield Microscope:
This is similar to the ordinary light
microscope. However, the condenser is modified so that the specimen is not illuminated directly. The condenser directs the light obliquely so that the light is diffused or scattered
from the specimen, which then appears bright against a dark background. Living specimens may be observed more
readily with darkfield than with brightfield microscope. An example is spirochaetes of Treponema pallidium.
Phase-Contrast Microscope:
The phase-contrast microscope is
most useful especially for increasing contrast and obtaining a better image of the interior of the specimen through
constructive and destructive interference effects on the image. An observation of microorganisms in an unstained state is possible with this microscope.
Its optics includes special objectives and a condenser that make visible cellular
components that differ only slightly in refractive indices. As light is transmitted through, a portion of the light is
refracted (bent) due to slight variations in density and thickness of the cellular components. The special optics
convert the difference between transmitted light and refracted rays, resulting in a significant variation in intensity of light and thereby producing a discerning image of the structure under study.
Fluorescent Microscope:
This microscope is used most frequently to visualize specimens that are chemically tagged with a fluorescent dye. The source of illumination is an
ultraviolet (UV) light obtained from a high pressure mercury lamp or hydrogen quartz lamp. The ocular lens is fitted with a filter that permits the longer ultra violet wavelength to pass, while the shorter wavelength are blocked or
eliminated. Ultra violet radiations are absorbed by the fluorescent label and the energy is re-emitted in the form of a different wavelength in the visible light range. The fluorescent dyes absorb at wavelength between 235 and 350 nanometer (nm) and emit orange, yellow or greenish light.
The microscope is used for detection of antigen-antibody reactions. Antibodies are conjugated with a fluorescent dye
that becomes excited in the presence of ultraviolet light and the fluorescent portion of the dye becomes visible against a background.
THE ELECTRON MICROSCOPE:
This instrument provides a
revolutionary method in microscopy with magnification up to one million. This permits visualization of sub microscopic cellular particles as well as viral agents. In the electron microscope, the specimen is illuminated by a beam of
electrons rather than light and the focusing is carried out by electromagnets instead of optics.
The components are sealed in a tube in which a complete vacuum is established. Transmission electron microscope requires specimen that are thinly prepared, fixed and dehydrated for the beam to pass freely through them.
As the electrons pass through the specimen, images are formed by directing the electrons onto photographic film, thus making internal cellular structures visible. are used
for scanning electron microscopes
visualizing surface characteristics rather than intracellular structures. A narrow beam of electrons scans back and forth
producing a three-dimensional image of the electrons which are reflected off the specimen’s surface.
While scientists have a variety of optical instruments with which to perform routine laboratory procedures and
sophisticated research, the compound brighfield microscope is the “mainstay and is commonly found in all biological/ biomedical laboratories. The compound
brightfield microscope will be further discussed in details.
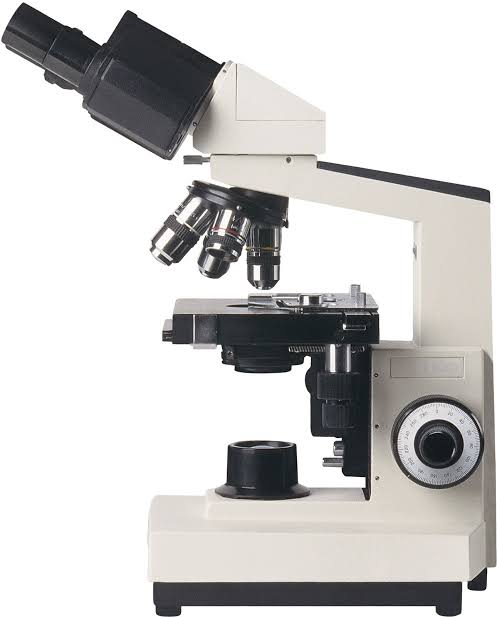
COMPONENTS OF THE MICROSCOPE
A typical microscope has its parts grouped into 4 systems namely:
1. The support system: The support system consists of:
a. Base or foot
b. Arm
c.Revolving nosepieced
d. Mechanical stage
2. The magnification system: This consists of lenses viz:
a. Eyepiece; located at the top of the tube where the observer applies his eyes.
b. Objective lenses; located at the revolving nosepiece.
3. The illumination system
a. Lamp Electric – easier to adjust, could be in-built or external. Daylight – useful only in subdued form.
Avoid direct rays.
Mirror – use plane side if there is a condenser and the concave side if there is no condenser.
b. Condenser
c. Diaphragm
d. Filters
4.The adjustment system: This system is made up of:
a. Coarse adjustment knob
b. Fine adjustment knob
c. Condenser adjustment knob
d. Iris diaphragm
e. Mechanical stage controls.
COMPONENTS OF THE E MICROSCOPE E AND FUNCTIONS
- Eyepieces: Pair of lenses used to view the magnified image from
the objective lens. - Interpupillary space: Used to adjust the distance between the eyes, so that a single overlapping image is obtained in
both eyes. - Diopter ring adjustment: Used to focus the image by turning it clockwise Or anticlockwise to obtain an image view in the samne plain for both eye.
- Body tube: Holds the eyepieces and divides the light between them.
- Revolving nosepiece: Houses the objective lenses and makes it possible to change quickly from one objective to another by turning. A click sound is heard on swinging an objective lens into position.
- Objective lenses: Bunch of lenses of various magnification powers used to view an object.
- Mechanical stage: A horizontal platform with anopening in the centre. Objects for viewing are placed,on it.
- Slide holder: Mechanical arm that is used to hold object or slide for a smooth and uniform movement.
- Condenser: The lens system found directly under the stage concentrates the light on the object to be magnified.
- Iris diaphragm: The condenser contains an iris diaphragm, a shutter, used to control/regulate the amount of light entering the condenser.
- Condenser adjustment knob: Used to raise the condenser for greater illumination or lower it to reduce the illumination.
- Filter: A blue colored glass that makes the light in the visual field to appear as natural daylight.
- Lamp: Light source in the basse of the microscope stand.
- Coarse adjustment knob: Focusing knob that raises or lowers the stage and allows a coarse adjustment of the image to be achieved.
- Fine adjustment knob: Focusing knob that allows a fine (perfect) adjustment of the image.
- Stage movement knobs: Used to move the slide in X and Y direction for complete coverage of object.
- Power switch: Controls the power supply to the microscope.
- Voltage regulator: Controls the power supply to the microscope.
HOW A MICROSCOPE WORKS
A specimen slide is placed on the stage of the microscope. As the power switch is put on, light enters the condenser
and thern through the slide and onto the object.
Light from the object goes into the objective. The light travels up long
empty tubes (body tube) into the eyepiece and finally image is seen in observer’s eye.
NOTE: The objective is near the object, while the eyepiece is
near the eye of the observer.
USE AND CARE OF THE MICROSCOPE
Learning how to and correctly operate the microscope and proper focusing of the object are important tasks. It will
ensure that the microscope’s lenses and other working parts are handled carefully, preventing damage to any of its
important parts.
The following routine procedures must be followed to ensure correct and efficient use of the microscope.
1. Place the microscope on a firm level bench or surface.
2. Plug the microscope into the electrical source and switch on the light at low intensity.
3. Place a specimen slide on the stage and hold with the stage clips on the fixed stage. Move the slide to centre. The specimen over the opening in the stage directly over the light source.
4. Focus the specimen with the Xl10 objective (scanning lens or low power lens) by turning the coarse adjustment knob.
5. Adjust the distance between the ocular (eyepiece) until both the right and left images becomes one.
6. Use the fine adjustment knob to bring the specimen into sharp focus.
7. Adjust the condenser to achieve optimal focus.
8. Routinely adjust the light source by means of the voltage regulator and/or iris diaphragm for optimum illumination, for each new slide and for each change in magnification.
9. Change to the higher objective. Be sure the condenser is raised as high as possible to maintain the intensity of the light. Most microscopes are par focal which means that when one lens is in focus, other lenses will also have the same focal length and can be rotated
into position without further adjustment. Only the fine adjustment knob will be used then.
10. Never adjust the stage upward while looking through the eyepiece. If you do so you will push through the slide and the objectives.
11. Use only the XI00 objective (immersion objective) for observation through immersion oil.